
Overview
This guide explains how to properly configure Master Control Terminals (MCTs) and Purchase Terminals (PCTs) for use in RenX and LevelEdit.
You can download the assets here:
These terminals were developed by Bumpaneer, with help from Abjab (for MCTs), AircraftKiller (for PCTs) and StoneRook. You may use them in any project as long as you credit Bumpaneer.
Note:
These instructions cover MCT setup only.
For PCTs, follow the same steps but do NOT check theIsMCTbox.
1. Prepare the MCT in RenX
- Open one of the provided files in RenX.
- Select a mesh and open the Modify tab on the right hand side of the screen (blue arc icon).
- Replace the mesh name prefix “prefi” with your building’s prefix (max 5 letters).
- GDI buildings typically start with
mg - Nod buildings typically start with
mn
- GDI buildings typically start with
- Update every mesh beginning with
prefi, but don’t rename anything else. - You may change textures if desired.

2. Export the MCT for use in Level Edit
- Go to File → Export.
- Give the file a name. A good convention is the format:
prefi_mct(replaceprefiwith the prefix for your building). - Save it into your mod’s main folder.
- On the next screen that pops up, select:
Hierarchical Animated Model - Click OK.
- The export should complete with no warnings or errors.

3. Create the Tile in LevelEdit and Enabling Physics
- Open LevelEdit and select your mod.
- Browse to:
mgpwr_ag_3nfor GDImnpwr_ag_3nfor Nod
- Single-click the file and press Temp.
- Give the new tile a name (
prefi_mctformat works well here).
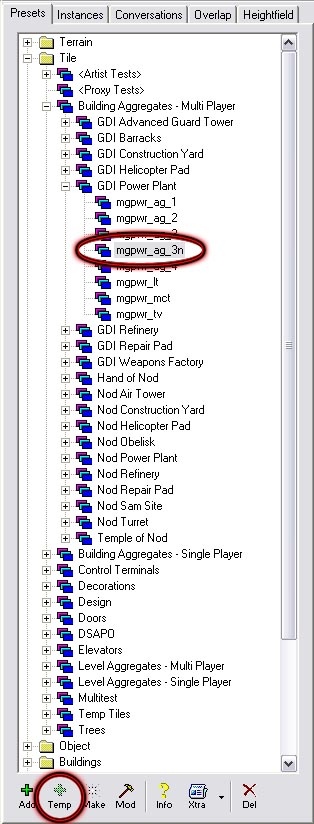
- Open the Physics Model tab (second tab).
- Scroll until you find
IsMCTand check the box. - Press OK to create the tile.
- You can drag this tile under another menu if you want to organize your list.
- To place the MCT in your map, select the tile and click Make, then you will be able to highlight the MCT and drag it to where you want it.

I hope these instructions have been helpful, and good luck with all your projects.
~Bumpaneer